Eggplant and Sausage Panzerotti

HOW TO MAKE EGGPLANT AND SAUSAGE PANZEROTTI

I give this recipe weekend status not because it’s terribly time-intensive. But simply because anything involving dough or pastry usually involves more time than we can give mid-week.

Weekday or weekend, I still recommend purchasing a good-quality prepared pizza dough from your local market. I say this not because you can’t make a fantastic dough on your own (and you can!) but because it adds unnecessary time. Good quality pizza dough can be found easily. No need to take time proofing your own dough – unless, of course, you’d like to!

You’ll need to pull out your prepared dough from the fridge about 20 minutes before using it in order to bring it to room temperature and to make it pliable.

HERE’S WHAT YOU’LL NEED:

Servings: 2 (assuming 2 panzerotti per person)

1 250g pizza dough (store bought), at room temperature

1 eggplant, diced into 1.5” pieces

5-6 cloves garlic

2 T olive oil

½ teaspoon dried oregano

salt & pepper

¾ cup (200g) pizza mozzarella, shredded (or fresh mozzarella, cubed)

2 Italian sausages, casings removed, and cut into 1” balls

1-1.5 cups marinara sauce

olive oil for brushing

white flour for dusting the dough

HERE’S HOW TO MAKE EGGPLANT SAUSAGE PANZEROTTI:

Prep your marinara: If you’re making your own marinara sauce, do this first. If you’re using my marinara sauce recipe, simply swap out the ground beef for the two Italian sausages. Remove casings on the sausages, break the meat down into 1” bits, sauté them, and then proceed with the marinara recipe (see my Eggplant Parmesan recipe). If you’re using jarred marinara sauce, simply sauté the sausage bits for about 3-4 minutes, then add about a cup and a half of jarred sauce to warm it.

Prep the eggplant for roasting: Cut the eggplant into 1.5” cubes. In a large roasting pan, toss the eggplant with garlic cloves, olive oil, oregano, and season well. Roast for about 30 minutes in the oven at 400˚F.

Combine the Eggplant and Marinara: When the eggplant has finished roasting, combine it with the sausage and marinara sauce.

Roll out your dough: Assuming your dough has been out of the fridge for about 20 minutes, cut it into quarters. Take each quarter and roll it into a ball, then work each quarter into a small circle, about 5” in diameter. Use flour to dust the dough to make it pliable and less sticky. Roll it out to about ¼” inch thick.

Fill the dough: Take each circle of dough and fill the right half with a scoop of eggplant/sausage mixture, top it with about a tablespoon of shredded cheese, and then seal the envelope of dough by turning the left side over to the right side to create a crescent shape. Seal the edges by pinching them and using a little water to seal any gaps.

Bake for about 14 minutes at 400F: Bake until the dough looks golden brown, about 14 minutes. Remember, both your eggplant and your marinara are cooked. The baking process in simply to melt the cheese, combine flavors, and bake the dough. Serve a panzerotto or two to each person.

TIPS AND TROUBLESHOOTING:

Be careful with liquid amounts in the filling: I use a slotted spoon when adding the eggplant/sausage/marinara mixture to the dough in order to control the liquid (i.e. the marinara). If you add too much sauce, this can break the seal of your pastry when baking. While liquid leaking from your pastry doesn’t affect flavor, it affects appearance – so…if you’re entertaining and making lots of these, you’ll want to be a bit careful!

Seared Pork Tenderloin with Cauliflower (A.K.A. Battle: Garlic Powder)

How to Make Seared Pork Tenderloin with Cauliflower

I’m instinctively an advocate for the unsung hero. And in this case, it’s two-fold: pork and garlic powder.

Pork seems to be the bastard child of white meats in the cooking world, and I’ve never understood why. Chicken is commonly heralded as the white meat of choice, the most versatile, the most affordable (which is highly questionable these days). And turkey holds the limelight on major holidays like Thanksgiving and Christmas.

But what about pork? In my mind, pork needs a brand re-boot as an enviable alternative to both chicken and turkey.

And as for garlic powder…

Being the know-it-all in the kitchen that I am, I often defy listening to my mother. And when it comes to garlic, and more specifically, garlic powder, I have taken issue in the past with guess who. I’ve caught my Mom using garlic powder in a number of recipes and attempted to apprehend her: “Garlic powder?!” (me, in an elevated voice). I mean, really. It’s a supreme sacrilege for any cook (outside of a dry rub).

Or is it? Well, I’ve since found one undeniably good use for garlic powder – and it’s cauliflower. Pan-fried until golden brown, then adding a sprinkling of – dare I say it, garlic powder – with a tab of butter at the end. The result is quite sublime (if you can believe it). I would even go so far as to say it beats the real deal – the clove.

I’ve paired this unorthodox side-dish with pork tenderloin because it just seems to fit – two unsung heroes meet to align and reign. Especially in warmer months when you want to bypass mashed potatoes (That said, I would suggest a side of potato and celeriac mash for this recipe when the season calls). So… perhaps this recipe is part-advocacy and part-reparation for anyone who has dared to challenge her own Mom, inside or outside the kitchen. It’s a way of graciously saying: “*Maybe* you were right.” (Admission can be tough, I know.)

Here’s What You’ll Need for the Pork Tenderloin:

Serves 3-4

  • 1 ½ lb. pork tenderloin
  • 1 T olive oil
  • 1 T butter
  • 3 T grainy mustard
  • 2 T molasses
  • 1 medium onion, chopped (or 3 shallots, sliced)
  • About a ½ cup white wine
  • 1/2 cup water or chicken stock

Here’s What You’ll Need for the Cauliflower:

  • A head of cauliflower, chopped into medium-sized florets
  • About a cup of water
  • 1-2 T olive oil
  • 1 teaspoon garlic powder (you heard me)
  • 2 T of butter

Here’s How to Make Pork Tenderloin:

Preheat the oven to 400˚.

In a Large Skillet: Season the pork well. Add olive oil and butter to a hot pan. When hot (very hot) and ready, add your pork, and with tongs, sear all sides – about 2 minutes per side, turning to make sure each of the four sides is browned.

Transfer to the Oven: Just before transferring the pork to the oven, add the onions (or shallots), white wine and water (or chicken stock) to the skillet. Mix the glaze of grainy mustard and molasses and coat the top and sides of the pork with the glaze. Put into the oven, uncovered, for about 16-18 minutes (until desired temperature (150˚-ish = slightly pink).

Let it Rest: For about 10 minutes, uninterrupted.

Here’s How to Make the Seared Cauliflower:

Cut the Cauliflower into Florets: Cut the cauliflower into medium sized florets. Place them in a deep skillet and add the water. Bring to a slight boil over medium-high heat. Cover and simmer over a medium-low heat for about 3 minutes. Check to see if they are tender crisp.

Allow the Water to Absorb: This is almost the equivalent of an absorption method in rice. Allow the water to absorb. If you find that the cauliflower is done to desired tender crisp, but there is still water in the pan, just drain it carefully. Then add the olive oil to the same skillet and move the florets around, allowing them to slightly brown over a higher heat. Then add the garlic powder, and butter. Toss them to incorporate and season well.

Tips & Troubleshooting:

For the Pork: If you don’t have molasses, you can use maple syrup. If you’re feeling herbal, you might also add a sprig of thyme. Also, gone are the days when we can’t have slightly pink pork. It depends on your taste, of course, but do not overcook it because you think it needs to be grey. It doesn’t. Lastly, if you find the liquid has all but absorbed by the time you take the pork out of the oven, and the pork is done, set the pork aside to rest and add a bit of chicken stock or water (or wine) to the pan to create a jus.This just means placing the pan back on a burner on a medium to high heat for a minute or so to reconstitute the onions in the pan and to create a kind of gravy.

For the Cauliflower: Don’t overcook it! Check to see if it’s tender crisp and drain any excess water before pan-frying. Overcooked cauliflower is not a good outfit. I say “3 minutes” here because I cut my florets pretty large. If you like to cut smaller, adjust the steaming time.

Serve up and enjoy!

QUICK PUMPKIN BREAD

HOW TO MAKE QUICK PUMPKIN BREAD

This recipe might seem unseasonal in May. After all, we’re heading into Summer with inspired notes of lemon, fresh basil, tarragon, asparagus, and summer peas and squash. So who cares about a pumpkin recipe? I do – and here’s why you might, too. Pumpkin bread is tasty any day, in any season. It’s for those slightly chilly and rainy Spring days when you crave a note of warmth that can only come from a baked treat with a hint of cinnamon. Or maybe it’s a day when no one seems to be listening to you and you need a warm hug? Snuggle up! Especially if it’s a Sunday and you can peruse a new series or film on Netflix with a cup of tea and some pumpkin bread. Relax and enjoy. Plus you can gift a few slices to deserving friends or neighbors. Trust me, they will appreciate a lovely baked sweet bread. YUM.

Ready to make Quick Pumpkin Bread?

Here’s what you’ll need:

  • 1 stick (1/2 cup) unsalted butter, at room temperature
  • ¾ cup of sugar, packed (preferably, demerara)
  • 1 cup canned pure pumpkin
  • 2 eggs, beaten
  • 1 ½ cups flour
  • 1 teaspoon baking soda
  • ½ teaspoon salt
  • 1 ½ teaspoons cinnamon
  • ¼ teaspoon ground allspice
  • scant ¼ teaspoon ground ginger
  • scant ¼ teaspoon ground nutmeg (or slightly less if freshly grated)
  • ½-1 teaspoon pure vanilla extract
  • 3 T (generous) plain yogurt

Here’s how to make Quick Pumpkin Bread:

Preheat Oven to 350˚: Grease and lightly flour a loaf pan.

In a mixing bowl: Cream the room-temperature butter with the demerara sugar with a hand-mixer or stand-mixer. Add the pumpkin and the beaten eggs.

In a separate small bowl: Combine your dry ingredients (flour, baking soda, salt and spices).

Add your dry ingredients to the wet: Add the dry-ingredient mixture in 3 parts, somewhat equally, while slowly beating them into the wet ingredients. Do not overmix. Just incorporate.

Add vanilla and yogurt: Add the vanilla and yogurt until just incorporated.

Pour batter into a loaf pan: Pour mixture into a greased and floured loaf pan and bake until a skewer inserted comes out clean – about 50 minutes.

Tips & Troubleshooting:

Butter vs. Oil: Okay, I will admit I’m a butter freak. And can anyone argue against the benefit of butter in baking? That said, if you choose to use oil, that’s okay. The creaming of the butter-to-sugar mixture isn’t really necessary in this case. Simply mix your oil and sugar, then proceed with the rest of the ingredients. I also recommend against seed oils (including canola oil) for health reasons, so try to opt for a mild-flavored olive oil.

Spices: Here again, I tend to be lush. I like a depth of flavor for a pumpkin bread. However, if you want to go with cinnamon only, that’s okay! I only suggest a splash of other spices (ground allspice, ginger, and nutmeg) to add depth of flavor. Perhaps this is more apropos for Fall? You decide!

Why the yogurt? I add plain yogurt as a last step of pretty much all quick breads because it contributes to an unparalleled level of moisture in the finished bread. Is it 100% necessary? No.

EASY BOEUF BOURGUIGNON RECIPE

Here’s how to make Easy Boeuf Bourguignon

I have this love/hate relationship with Boeuf Bourguignon. Probably because I’ve never bought into the fuss with the classic Julia Child / French recipe. It’s a bit “much ado” in my opinion. However, not about nothing. But I think I’ve cracked it – a super tasty recipe, but a lot simpler than the traditional French recipe (or Ms. Child’s). And I’ve even paired it with gnocchi (instead of the traditional mashed potatoes) – sacrilege, I know!

You’ll also notice that I bypass the pearl onions altogether (which are traditional in this recipe) – not worth the time in my opinion.

IF you love mushrooms – make them separately and add them in after. You can also bypass the mushrooms (okay, I know, I’m fired!).

Ready to make Easy Boeuf Bourguignon?

Here’s what you’ll need:

Servings: 4

  • 3 T olive oil
  • 2 slices of good quality smoked bacon, cut into ¼ -inch slices
  • 2 lbs. sirloin tip roast beef, cut into 2-3-inch chunks (or any stewing beef, like chuck)
  • 3 large shallots, sliced (or one medium white onion, diced or chopped)
  • 2 large carrots, sliced into ½-inch slices
  • 3 cloves of garlic
  • 1 T tomato paste
  • 1 T white flour
  • 3 cups red wine (recommend: Pinot Noir)
  • 1 ½ cups beef broth (or warm water mixed with 1 cube of beef bouillon)
  • Spring of fresh thyme
  • Salt & pepper
  • 250 g gnocchi (1 package)
  • Fresh Italian parsley or basil, for garnish
  • Plain yogurt (optional)

For the mushroom folks:

  • 450 g cremini mushrooms, halved or quartered
  • 2 T olive oil
  • 1-2 T butter
  • 2 cloves garlic, crushed
  • Salt & pepper

Here’s how to make Easy Boeuf Bourguignon

Pre-heat your oven to 325F.

Prep your beef. If you’re using a sirloin tip roast that hasn’t yet been cut down, cut it into 2-3” squares. If you’re using pre-prepped stewing beef, it’s good to go. Season the beef.

Heat the Dutch oven: Heat the olive oil a medium-high heat, add the bacon and render it down to release the fats and make it crisp. Remove the bacon rind and set aside. Add the seasoned beef chunks to the same pot and sear on both sides until browned – about 2 minutes per side. Remove the beef from the pot and set aside.

Add your aromatics: Add the sliced shallots to the same pot, move them around for about 1-2 minutes. Add the carrots. Move them around for about a minute. Add the garlic. Add the flour and incorporate it into the onion/carrot/garlic mixture, which will slightly thicken it. Add the red wine and beef stock (or water plus bouillon cube). Allow it to come to a simmer. Add the tomato paste and whisk it in. Then add the beef and bacon back into the pot. The liquid should just cover the beef. Add a sprig of fresh thyme.

Put it into the oven for braising: Cover the pot and put it into the oven on a low heat (325F) for about 2 ½ hours.

In the meantime: If you’d like to add mushrooms to the final dish, cook them separately about a half hour before the end of the beef cooking time: Heat olive oil and butter on a medium high heat. Add garlic and cook for about a minute. Add the mushrooms, season, and keep moving them around until their water is released and they start to settle. (Mushrooms contain a lot of water that gets released in cooking. Just render them out for a couple minutes). Set aside until the beef is done, and then add to the beef before serving.

Serving sides: Mashed potatoes or gnocchi? I quite like gnocchi for this recipe, but, by all means, serve with a mash if you prefer. For the gnocchi, simply cook about 3 minutes according to the package instructions, and serve the boeuf bourguignon on top, with a bit of fresh Italian parsley, or even basil, as garnish.

Tips and Troubleshooting:

Cuts of Beef: I personally prefer sirloin tip because it’s a slightly higher-grade beef than typical chuck roast (or stewing beef). However, both work for this dish. The sirloin tip is slightly less fatty, as it’s cut from the hindquarters unlike chuck beef which is cut from the shoulder. Also, chuck is tougher than sirloin tip, which means you might need to add extra time to the braising to achieve desired tenderness. Sirloin tip gets tender within the 2 ½ hour time-frame prescribed in this recipe.

Bring Me the Bacon: I recommend smoked bacon for this recipe. Just make sure your smoked bacon is not “maple-smoked” as this adds a level of sweetness that I don’t recommend for this dish.

Shallots vs. White Onion: This is a matter of preference. I like shallots for this recipe as they lend a nice balance of sharpness and sweetness. However, white onion works just as well – it’s simply milder in flavor. I’m a firm believer in using what’s at hand, so check your pantry. Don’t go buying shallots if you have a nice white onion, in other words. Not worth the time, effort and extra money.

Which Red Wine Do I Choose? Julia Child recommended a Burgundy wine for this recipe. This basically means a Pinot Noir – ideally from Burgundy, France (as opposed to a California Pinot).  While this is not strict advice to follow, I’ll tell why it’s good advice. French Burgundies are medium-bodied, intensely fragrant wines with a fruity, elegant palate (think: cherries), with highish acidity and low levels of tannins. This wine works well in this recipe to mediate the richness of the sauce. A fuller-bodied red wine, such as a Bordeaux, or an Italian Primitivo, for example, will work, but will yield a very rich sauce due to the added body of the wine. I’ve found this result a bit over the top in richness and suggest adding plain yogurt as a garnish, if you choose such a full-bodied wine (see image below).

Seafood Sleuths

Oceana Is Back with Another Report On Canada’s Fish Fraud Scandal

“Think you know the whole story about your seafood? Think again.”

These provocative words open Oceana Canada’s new campaign video, posted on YouTube on the heels of their most recent investigative study of Canada’s fish fraud dilemma. The video, which is part public-service-announcement and part call-to-action, exposes the Canadian government’s broken promises to remedy the nation’s on-going fish fraud issue and calls on members of the public to join the effort to demand government action.

Fish fraud is not a new concern. Oceana Canada has been tracking this issue nation-wide since 2017. In their 2017-18 study, researchers found that 44 per cent of the 400 samples of fish tested across five major Canadian cities were mislabeled. A year later, they conducted a Montreal-specific study which showed that a whopping 61 per cent of fish samples were either a substituted species or didn’t meet the labelling requirements set by the Canadian Food Inspection Agency (CFIA).

Oceana’s most recent report, published this month, covers their research from earlier this year across four major Canadian cities – Toronto, Montreal, Ottawa and Halifax. Researchers tested 94 seafood samples from grocery stores and restaurants to find 46 per cent were mislabelled – a finding consistent with their 2018 report.

So why has the Canadian government been sluggish in dealing with this problem?

Governments are notoriously not the swiftest actors. Add in a pandemic, and they’re likely working at glacial speed. But there’s another factor at play: CFIA conducted their own study on fish fraud between 2019 and 2020. They surveyed 362 samples of fish across Canada and revealed a 92 per cent accuracy rate in labeling of all fish varieties sampled.

The discrepancy between CFIA’s 8 per cent margin of error and Oceana’s 44 to 46 per cent is not a small margin, particularly considering the studies were done within two years of each other.

In fact, the discrepancy demands scrutiny. A closer examination of the research design of each study offers insight. One theory might be that each study sampled different varieties of fish which yielded widely divergent results. But this is not the case. The CFIA studied nine types of fish: butterfish, cod, halibut, sea bass, snapper (red and other), sole, tuna, yellowtail, and kingfish. The Oceana study also sampled nine varieties: butterfish, cod, halibut, sea bass, snapper, sole, tuna, yellowtail and salmon. In other words, all fish varieties matched between the two studies with the exception of CFIA choosing kingfish, while Oceana chose salmon instead. And while we might wonder if the prevalence of salmon in market consumption might explain the skewed results, it doesn’t. Salmon ranked least likely to be mislabeled in the Oceana study with a mislabeling rate of 18 per cent.

If a difference in fish varieties sampled doesn’t explain the discrepancy in each study’s results, what does?

Here’s one theory. The CFIA inspectors collected fish samples from domestic processors, importers and retailers (fish packaged at retail). Restaurants were excluded as a source of fish samples. This omission is significant because the Oceana study revealed that restaurants were one of the biggest offenders when it comes to mislabeling – more than half of the restaurant samples tested were mislabeled. By removing restaurants from the list of sources, the CFIA report might be falsely reassuring.

Conversely, according to Oceana, at food retailers, including grocery stores and markets, the rate of mislabeling was 22 per cent. While not effectively aligning with the CFIA results, the lower rate of mislabeling at retailers in the Oceana study does bring us closer than at first glance to a comparable result between the two agency’s studies, if we remove restaurants from the equation.

Anyone familiar with food writer Laura Reiley’s investigative report of food fraud, including fish fraud, in the Tampa Bay area will understand the significance of omitting restaurants from any study purporting to detect food fraud. Reiley states from the outset of her article: “I’ve been had, from the snapper down to the beef.”

Her stellar journalism backs up that statement. She rightly identifies the allure of the promises of “buying local” or “sustainable sourcing” in the marketing of restaurants. And she put to task the all-too-frequent claims made by restaurants in the Tampa area. Most fell short of their claims. The problem she expertly identifies is: “Buying local” and “sustainable sourcing” are too often convenient fictions, used by restauranteurs hoping to increase their customer base – and bottom line.

Taking a cue from Reiley’s reporting, as well as Oceana’s multi-year studies, it seems crucial to include restaurants in any study on fish fraud in order to capture accurately the big picture.

And why should we care so much about fish fraud? For a few reasons. Fish fraud affects your pocketbook, your health, and the public’s trust in our food systems and the regulations therein. Ordering grouper and getting tilapia creates a price differential. Tilapia is a cheaper fish. Ordering wild-caught fish and getting farmed presents a potential health challenge you didn’t bargain for. Oceana points out another consequence of poor traceability in their most recent report: Canada’s contribution to and losses from illegal, unreported and unregulated fishing around the world. Their report found that Canada is losing millions of dollars each year because of “opaque seafood supply chains.”

But perhaps most importantly, proper labeling and an absence of misrepresentation in food products goes a long way in building the public’s trust. If the Government of Canada wants to ensure the public’s trust in its food regulatory provisions, including the tracing of food origins, quality and safety, the presence of misrepresentation of products such as fish undermines that trust.

According to market research conducted by Abacus Data for Oceana Canada earlier this year, 87 per cent of Canadians are concerned about purchasing seafood that is mislabeled, up 11 points from 76 per cent in December 2020. Moreover, 86 per cent are concerned about the Government’s lack of action in addressing seafood mislabeling and illegal fishing in Canada.

So what is the Government doing about all this?

In 2019, Canadian prime minister Justin Trudeau issued a mandate letter to the health minister to develop a boat-to-plate traceability program. This mandate has turned into a multi-department initiative, with the CFIA identified as the lead, working with Agriculture and Agri-food Canada (AAFC), and Fisheries and Oceans Canada (DFO).

According to a CFIA spokesperson, CFIA, DFO, and AAFC have “actively engaged with a broad range of stakeholders, such as industry and industry associations, non-government organizations, academia, and Federal and provincial partners, to gather perspectives on measures to fulfill the mandate commitment.” A joint discussion paper, on behalf of all three organizations, is supposed to be published this Summer. For Oceana, this is seemingly not soon enough. And summer is winding down.

When asked if “industry stakeholders” include restauranteurs, CFIA offered this: “Industry stakeholders include all players in the seafood supply chain and, as such, the restaurant industry.”

This inclusion bodes well in terms of filling in the gaps between the Oceana and CFIA studies. Stakeholders and consumers alike eagerly await the results and recommendations of this initiative. Whether or not this discussion paper will call out the need to focus the lens more tightly on restaurant compliance with product labeling, however, remains to be seen. One thing is for certain: if it does not, or if these government agencies continue to drag their feet on implementing a robust boat-to-plate traceability program, Oceana Canada will be knocking loudly at their doors – along with the 87 per cent of concerned Canadians.

This article was originally published in August 2021.

COTTAGE CHEESE: DON’T CALL IT A COMEBACK

The Spring 2024 issue of the LCBO’s Food & Drink is out. A banner day for us foodies who anticipate any issue of the mag, but especially the one that signals that Winter is behind us.

The cover image depicts what looks like an elevated avocado toast. Elevated by a supporting appearance by none other than the fluffy, cloud-like edible that has been rocking the internet for the past couple of months: Cottage cheese. In fact, as someone who’s never really taken to the avocado toast fad, this updated version has even me interested.

Why? Well, it’s kind of like this: If you grew up in the 90s and remember buying actual CDs and going to concerts long before your favorite bands were internet sensations, you probably have a story about that one band you were the first to admire – you were their “charter member,” the one who took pride in her own prescience – and wanted everyone, including the band, to know about it.

I feel this way about the current cottage cheese trend. That is, I’ve been appreciating cottage cheese long before TikTok or Gen Z-ers sang its praise. I’ve been applauding its versatility, its low-fat status, its high protein content, its effortless simplicity – for a good decade now. In other words, I was a charter member of the cottage cheese club.

But so was Jamie Oliver.

In fact, I can’t claim foreknowledge of the cottage cheese craze without giving credit to Mr. Oliver, who has been heralding its benefits since at least 2012. As proof, I’ve recorded episodes of his series, 30 Minute Meals, where he provides numerous uses for the humble curds. He also explains why they mysteriously seem to keep making cameos in his half-hour shows, despite his chef-y sensibilities: His wife, “Jools,” had a habit of buying them, and Mr. Oliver felt obligated to find a use for them. The result? A surprisingly high number of tasty applications for cottage cheese.

And so, as an Ode both to the curds and to Mr. Oliver’s charter member status in the cottage cheese fan club, I’d like to share what I believe is his best effort on the curd front: Balsamic Beets with Lemon-scented Cottage Cheese. I can’t say my rendition is exactly Mr. Oliver’s version, but it’s pretty close:

BALSAMIC BEETS WITH LEMON-SCENTED COTTAGE CHEESE

Ingredients:

  • A package of roasted beets (the kind you buy in an airtight package in most grocery stores – usually 4-5 beets in a package)
  • 1 T Balsamic vinegar
  • 2-3 T Olive oil, plus more to dress the cottage cheese
  • About 4 leaves of fresh basil, torn (or chiffonade if you’re fancy)
  • About 1 cup of cottage cheese
  • Zest of 1/2 lemon
  • ¼ teaspoon of fresh thyme, chopped
  • Salt & pepper

Instructions:

In a medium sized bowl, quarter or cube the beets. Dress them with balsamic vinegar and olive oil – about 1 T of vinegar to 2-3 T of olive oil. Season to taste, add the basil and give them a toss.

In a separate small bowl, dress the cottage cheese with a splash of olive oil (about a teaspoon), the lemon zest, the fresh thyme, and season to taste.

To serve, I recommend individually plating one portion of beets, and topping it with a heaping tablespoon of the cottage cheese mixture. This is optional, and a slight deviation from Mr. Oliver’s instructions – he advises a family-style plating. (I think it’s neater to individually plate this recipe.)

I guarantee this recipe will surpize you. It is delightfully fresh, light, and rich in flavor all at the same time.

And so… don’t call it a comeback. Because, for some, like Jamie Oliver and his devoted viewers, like me, cottage cheese never left the spotlight in the first place. Bon appétit!

GRILLED EGGPLANT PARMESAN RECIPE

Grilled eggplant parmesan is next level eggplant parm without the fuss and frying!

DREAMING OF EGGPLANT PARMESAN?

OK, so let’s talk eggplant parm. I remember my grandmother making this classic dish by pan-frying the eggplant in a skillet prior to assembly. WRONG. No offense to my Italian American Nana, but eggplant shouldn’t be fried (and, yes, I feel an evil eye coming my way). For one, frying adds extra fat. And two, it makes your parm extremely heavy. Instead, GRILL the eggplant! Grilling makes for a lighter parm and adds the smokiness of simple indoor grilling – and, yes, indoor grilling adds noticeable smokiness – and takes your parm to the next level.

Think grilling adds extra time to this dish? Think again! Frying usually requires dredging the eggplant in both flour and an egg mixture. Grilling requires nothing more than slicing and seasoning the eggplant. PLUS: by grilling the eggplant, it is essentially cooked by the time you bake it, cutting down on baking time!

I do, however, recommend making your own marinara sauce – and I’ve included that simple recipe here, too.

Ready to make your Grilled Eggplant Parmesan?

HERE’S WHAT YOU’LL NEED:

*this recipe serves 4

  • 2 medium-large sized eggplants (sliced into ½” slices)
  • Salt & pepper
  • Olive oil
  • Marinara sauce
  • 200 g (~1 cup) of fresh mozzarella, or a good quality pizza mozzarella (sliced into ¼” slices)
  • Parmesan cheese, freshly grated
  • Fresh basil, for garnish

For the marinara sauce (if you’re making your own, instructions follow the parm instructions):

  • 3 T olive oil
  • 1 medium onion, diced
  • 2-4 garlic cloves, depending on your taste, crushed, minced, or finely sliced
  • about ¾ lb. ground beef (optional)
  • 796 ml (28 oz.) tinned whole tomatoes (I like Mutti) – or crushed tomatoes or passata if you prefer a smoother sauce
  • about a ¼ cup red wine (or white)
  • 1/4 teaspoon dried oregano (or a small sprig of thyme if you prefer)
  • about 1/4 cup of freshly grated parmesan cheese
  • Salt & pepper

HERE’S HOW TO MAKE NEXT LEVEL GRILLED EGGPLANT PARMESAN

Prep your marinara: If you’re making your own marinara, do this first, and keep it warm (my recipe is below). If you’re using a jarred sauce, have it ready to go by keeping it room-temperature or warm in a separate sauce pot.

Prep your eggplant and the grill: Get your indoor grill hot and ready. I use a 19.5 x 10” grill from LODGE that occupies two burners, vertically. Brush your grill with a bit of olive oil. Slice the eggplant into ½” slices. Season on both sides with salt and pepper.

Grill the eggplant: When the grill pan is hot (medium-high heat), place the eggplant slices onto the grill. Grill for about 3 minutes per side. You should see deep, char grill marks. If you’re using a grill pan like mine, the grill pan should fit one medium sized eggplant, about 11-12 slices. In which case, do the same with the second eggplant – slice, season, and grill, and put aside.

Assemble your parm: In a large baking or casserole dish (at least 14” x 13”), lightly coat the bottom of the dish with olive oil. Then add a thin layer of marinara on the bottom of the dish. Begin layering the first slices of eggplant. On each slice of eggplant, place a bit of marinara, then a slice of mozzarella, then a dusting of parmesan cheese. Repeat with another slice of eggplant, marinara, mozzarella, and parmesan. Then top with a third slice of eggplant. You should have about 8 towers of eggplant consisting of three slices of eggplant in each tower. Cover with a dusting of parmesan.

Bake for about 20 minutes at 400F: Bake until the cheese melts. Remember, both your eggplant and your marinara are cooked. The baking process in simply to melt the cheese and combine all the flavors. Serve a tower (or two) to each person and garnish with fresh basil.

TIPS AND TROUBLESHOOTING:

“My family is full of carnivores”: Mine too! I actually make my marinara as a Bolognese. Instructions are below.

“I don’t have as large an indoor grill”: If your indoor grill pan only accommodates one burner, you’ll have to perform the above grilling in 4 stages, if you’re serving 4 people. The good news is, if you’re cooking for two, you’ll only have to grill in 2 stages, one stage per half eggplant and halve the entire recipe (i.e. one eggplant as opposed to two). Or…invest in a larger grill pan that occupies two burners – this saves a lot of time and has many, many applications – the one I have is reversible! Investment: about $70.00 USD.

Size of the eggplants: Try to choose medium-large sized eggplants that will give you 11-12 slices each. I generally discard the upper 1-2 slices at the neck of the eggplant if they are too narrow. This recipe allows for 4 servings, which assumes 2 towers per person, with each tower consisting of 3 slices of eggplant (i.e. 6 slices of eggplant per person, 2 towers/person). If you’re serving this as a first dish (but not the main event), I recommend one tower/person.

MY MARINARA SAUCE RECIPE

Making your own marinara is simple and well worth the effort when compared to current store-bought sauces, which, in my opinion, are outrageously overpriced.

HERE’S HOW TO MAKE YOUR OWN MARINARA

Heat the olive oil in a dutch oven or large sauce pot. Then add your diced onions. Season them with a bit of salt. Sauté until onions are translucent, about 2 1/2 minutes. Add your garlic and move it around for about a minute (garlic cooks quickly and you don’t want it to burn it!).

Add ground beef if you’re using ground beef. Cook for about 3 minutes until the beef looks sealed – that is, until outer edges are no longer pink.

Then add the whole tomatoes. Despite other cooks who might recommend rinsing the tin of tomatoes with a bit of water and adding it, I do NOT recommend this. Instead, if you want to thin out your sauce slightly, add a splash of chicken stock (about 2 T). Break up the whole tomatoes with a wooden spoon to desired texture. Personally, I like a rustic sauce, so I go light on the breaking up. Then add your wine. Allow the wine to evaporate and cook down, about 2 minutes. If you like thyme, add a sprig. If you like oregano, add it dried. If you have a parmesan rind, add it in. Give it a stir and leave it to simmer for about 15 minutes on a low heat.

Finally, add the grated parmesan cheese if you haven’t added a parmesan rind earlier. If you have, skip the added grated cheese. (Don’t add the grated cheese earlier, as the flavor will dissipate quickly.) That’s it! Your home-made marinara is ready to use in your grilled eggplant parmesan recipe.

Force of Habit

This article was originally published by The Globe and Mail on April 19, 2019.

The nuns at Our Lady of Mercy could be ruthless.

I vividly remember the day Sister Kateri decided to announce each student’s I.Q. score to our Grade 5 class. Without warning. And while mine ranked second highest, I cringed when I was called up to the blackboard afterward to solve a math problem in what seemed to my nine-year-old mind to say: “See, this is what those with a higher I.Q. can do!”

Ugh. I shrank back into my seat, embarrassed by my participation in an exercise to make my classmates feel less than.

Our Lady of Mercy was a convent school in Orchard Park, New York, meaning it housed both the school and the convent. To the right of the statue of Mother Mary was the school; to the left, the convent.

I often sneaked around the convent side, peering into empty rooms amidst the deafening silence coming from that side. What did the nuns do here? Most rooms had coffee tables surrounded by wooden chairs and small sofas upholstered in drab brown fabric. The religious art and crucifixes that adorned the walls bordered on the macabre. I wondered what kinds of conversations happened there. Did they talk about normal stuff or did they just pray? Did they ever play cards, listen to music, laugh?

Realizing that my extended washroom break might get me into trouble, I scurried back to my classroom to face the next dreaded task pressed upon me to perform.

Whether or not Sister Kateri had anything to do with my eventual abandonment of Catholicism or any other religion is unclear to me. But by the time I was 10 years old, I confronted my father with a firm belief that people only believe in God because they fear death. I asked him to end the torture of my elementary Catholic school education in favour of application to the private school of my choice in the city.

My father obliged, though I don’t think he had much choice. I switched schools, discovered Freud, and enjoyed some concrete validation of my 10-year-old insight.

I came to Toronto to study psychoanalysis. A staunch Freudian at the ripe age of 17, I was adamant that any belief in God could only be explained in terms of humanity’s need for something beyond this life to hang our hopes on. This life couldn’t be it. That would be too devastating to swallow. Moreover, by assigning to God all of our greatest attributes, the “believers” seemed to be saying, hey, someone got it right, even if we didn’t. And He forgives us. And even better, if we’re not too bad, we might get a special place up there, beside Him. (Notice I’m using capitals, just in case.)

But despite all my precocious cynicism, critical thinking, and studies, I remain fascinated by nuns.

Growing up, my mother’s family were devout Catholics. My grandmother would routinely entertain priests for dinner at my grandparents’ house, with her usual spread of Italian-American delicacies: pasta in a homemade tomato sauce, bruscoli, sausages, stuffed peppers, fresh bread from the local Italian bakery. The wine, in bottles with straw casks, would flow liberally with the conversation.

I was so impressed by my grandmother’s allegiance to these priests that I actually wondered if she might be having an affair with one or more of them. Or at least fantasized about it. When I was in Grade 10, I wrote a short story about her relationship to these priests (which, I should say, won me top prize in the short story contest at my school).

I saw up close how the priests got all the acclaim. They were wined and dined by parishioners, like my grandparents, on a weekly basis. They had cars, money, invitations to events, tickets to the opera, vacation plans.

Yet nuns seemed entirely absent from parishioners’ appreciation – or anyone else’s appreciation for that matter. They vowed a life of poverty, chastity, and obedience, yet they worked hard – in hospitals, schools, orphanages, missions.

Some historians, like Heidi MacDonald, dean of arts at the University of New Brunswick at St. John, claim that 40 per cent of our Catholic schools and hospitals were built on the backs of nuns between the late 19th and 20th centuries. But that contribution to the Canadian work force and economy has been deeply under-valued over the past century and a half in large part because Census Canada never accurately accounted for their work in their enumerations.

Nuns can be found in both Christian and Buddhist religions, but the vast majority in Canada have been Roman Catholic and affiliated with the schools and hospitals that served about 40 per cent of the population who identified with that denomination between 1871 and 1961, as noted by Ms. MacDonald.

The Ursulines were the first order of nuns to arrive in Canada in 1639, led by Marie de l’Incarnation. They established a convent in Quebec and started the first school for girls in North America. Their students were Indigenous and French girls. The Ursulines eventually spread their work West and as far south as New Orleans. I was lucky enough to visit the historic complex in the French Quarter which was a former site of the Ursuline Academy and now stands as a museum to commemorate their work not only in establishing the first Catholic school for girls in the United States in 1727, but in running an infirmary for the orphanage also housed within their convent. The current building that houses the Ursuline Academy is a few blocks up the street from the Old Ursuline Convent Museum and remains the oldest school for girls in the United States.

I ended up a producer in film. A few years ago, I pitched an idea about nuns to a major Canadian broadcaster. I had interviewed three nuns for this pitch, all of whom had fascinating stories about why they had chosen to enter the convent.

It seemed unfathomable to me that, despite the depravity in the world today, anyone could still see it fit to grant humanity that kind of devotion, and so I asked them the same question: “Where do you find such faith in humanity in this day and age?”

One said she felt a calling while acting in a production of the Dan Goggin musical Nunsense. And she needed to pursue that calling. Another intimated that, no matter the state of the world, there must be some who have faith both in humanity’s promise and in the effort to help those in need around the world. She turned down a marriage proposal in a three-year relationship in favour of a marriage to God and servicing those in need.

But who does this anymore?

Well, it turns out that, despite a steady decline in the number of women joining the religious life between 1965 and about a decade ago, some orders are seeing a rise in women choosing the conventual life.

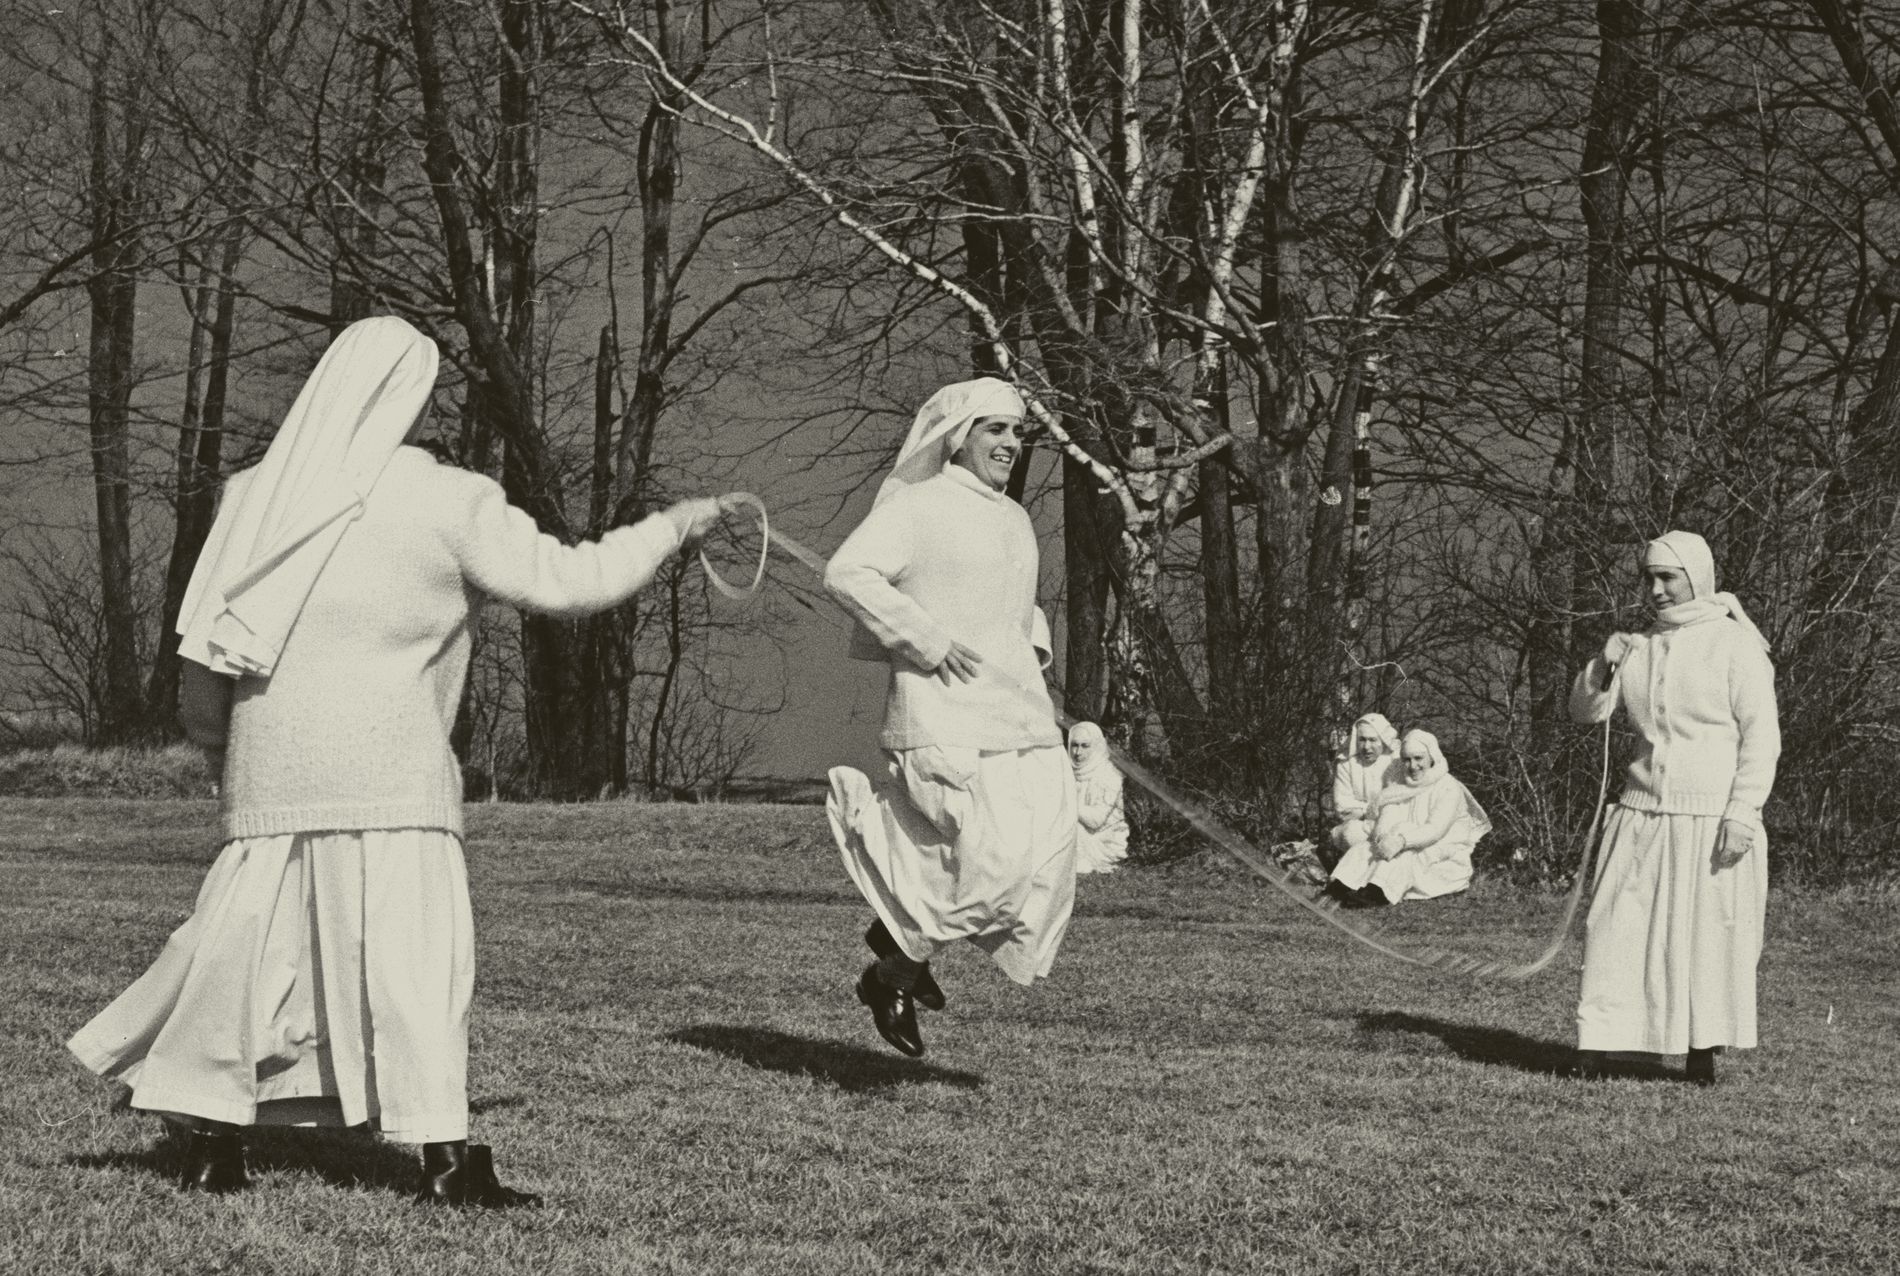
Over the past year, I’ve witnessed a group of nuns, on several occasions, enjoying the beach in my Toronto neighborhood. The first time I observed them, they were running along the sand, their habits fluttering in the wind, giggling like school girls under the setting sun.

This image of them was so bracing that I stopped to watch them for a few minutes, while trying to be discrete about my spying on them. They appeared other-worldly: Beacons of peace and days long gone by. They were the very essence of hope – in humanity. That they still existed in this world was anachronistic and marvelous all at the same time.

After a little digging, I figured out that the order of nuns I keep seeing on the beach are the Sisters of Life, a very traditional order of nuns that chooses to wear full habit all of the time. The Sisters of Life is one such order that is seeing rising numbers of women joining. Their order more than doubled in size between 2006 and 2016. And there seems to be a trend with orthodox orders gaining momentum in increasing size. The Dominican Sisters of Mercy, a conservative order based in Ann Arbor, Mich., has recently expanded to Austin, Texas. Founded in 1997, they now have more than 120 sisters whose average age is 30.

Yet despite the growth and contributions they’ve made to teaching, hospital work, institutionalized social work, and missionary work for the past four centuries or so, nuns continue to play second fiddle to priests. Not only are they not allowed to be paid directly for their services – their paychecks go to the congregation – but they live in poverty, unlike the priests, who enjoy many accoutrements of life.

Nuns tend to stay out of trouble, too. And I would venture to say that anyone who still believes in the sanctity of the Catholic church might as well credit the nuns for their faith. Some priests sure let everyone down.

In pondering anyone’s motivation to join the religious life and to remain devoted both to God and to those in need, despite the dire state of the world and its increasing secularization, it occurs to me that there is something to be said for sheltering oneself from the drudgery of daily news. We are bombarded by evidence of a declining culture obsessed with empty celebrity and the pursuit of materialism, poisoned by political partisanship, marked by abuses of our most valued institutions – our courts, our legislatures, the very foundations of our democracy. Turning on the news on any given day is demoralizing, infuriating, and just plain depressing.

The nuns sure seem to have it right. Turn off the news. Focus on the contemplative life, a life full of meaning, goodwill and service. Live actively, not reactively. Focus not so much on why there is so much turmoil and suffering in the world but, rather, on how you can make it better. How you can contribute to the healing, whether locally or abroad. Nuns don’t concern themselves with trivialities – they’re much more concerned with who is in need today, and how they can serve.

Perhaps if we all adopted this kind of single-mindedness and disregard for who is to blame, we’d all get along better. The nonsense of the world would be replaced by nunsense. And I’m guessing we’d all be a lot better off.

And while I know very well that this utopian dream is never going to happen, it begs both consideration and considerable appreciation of their service. Not that they expect any thanks. The charitable work that nuns contribute is selfless, pure and not expectant of any reward – the very essence of virtue.

So my hope is that the next time you cross paths with a nun – on the street, in a grocery store, on the beach – you will stop to appreciate that you have been blessed. Not only by crossing paths with her, but by her presence in your world.


Jillian Michaels’ Maximize Your Life Tour: A Kick in the Ass

“The ones who mind, don’t matter. The ones who matter, don’t mind.”
-Dr. Seuss

Jillian Michaels stormed the stage of the Sony Centre in Toronto Tuesday night in her signature powerhouse-even-at-5’3” style – the final show of her “Maximize Your Life” tour. The quote from Dr. Seuss, which she referenced late in the evening, underpinned one of her most salient points of the night: when we are redefining our own truth (aka refusing to be sheep in life), we will elicit adversity from various people (said sheep). Our responsibility to ourselves is to differentiate between those who mind our path and those who do not. All those who mind should be booted off the island.

Very big and truthful words.

I’ll get back to Dr. Seuss. There was more to the evening.

Her show was divided into two segments, the first dedicated to nutrition and exercise, not surprisingly, the second half to “the self,” our emotional and psychological wellbeing – what holds us back, what we need to change in order to live a full life. That’s usually where I tune out, ever suspicious of anyone purporting to be a self-help expert. But Jillian Michaels has always struck me as pretty legit – at least as a personal trainer, so why not as a life coach?

Let’s start with the first half. Ms. Michaels credited her international stature as the premiere leader in all things fitness to her formula: “eat less, move more.”

And yes, she was the first to point out the “unoriginality” of those four words while laughing on the way to the bank.

Novel or not, what struck me, as an audience member, was how those four words appeared to be lost on so many people.

In a Larry David-esque moment, I wondered how many people in attendance actually did her workouts. Or did they simply watch them from the comforts of their cushy sofas?

I expected to be seated among a bevy of fit people. The kind of people who live and breathe all the tips, cautions and militaristic orders that Ms. Michaels is famous for. People in spandex and leggings jeans.

Ms. Michaels pulled no punches on the topic of exercise and how hard we need to work: “Move your ass fast.”

Perhaps some of these people underestimated just how fast?

Ms. Michaels held her audience’s attention for an impressive two and a half hours, leaving me to believe that her words might sink in.

Her first hour or so on nutrition and exercise hovered largely around the food industry’s shady business of hiding non-food ingredients in our food. She even referenced various lawsuits against her for such allegations – ones she shares with many other health gurus brave enough to challenge the food industry execs, lobbyists and the FDA.

When it came to the second segment’s subject of “self,” my ears opened wider. Not only because Ms. Michaels gave some genuinely constructive advice but because my firm belief was that this issue of “self” or “self-actualization” – or self-discipline? – was of some significance to our relationships with food and exercise. If we haven’t tackled internal demons that deprive us of the motivation to exercise, to buy organic, or to be the fittest selves we can be, all the tips on what to buy, what to eat, how fast to move our asses, well, they don’t really matter.

When she arrived at the Dr. Seuss quote on the subject of separating ourselves from the sheep and defining our own truths, even in the face of adversity, I realized the room couldn’t possibly be filled with uber-fit folks because, well, why would they need her advice?

And then Ms. Michaels posed this closing question: “So. Who’s gonna get up tomorrow and do things differently?”

Which made me wonder why I was there. I’m fit, I buy organic, I move my ass fast. Why did I go? I thought it was because her workouts made me fitter than I’ve been in 10 years and this inspired me to honor her by attending her lecture. But it was more than that. There’s a little sheep in me, too. To Ms. Michaels’ point, I still struggle beneath the “fear, shame, expectations, judgment and responsibilities” that swirl around me.

So today I got up and made a commitment to myself to spend more time writing. No matter whose expectations I fear I am not meeting (“minders” will be cast out).

We can all use a kick in the ass in our pursuit of the freedom of true self-definition, no matter what our body weight is. For that kick, I thank Ms. Michaels.images

Stressless Selling: 5 Tips to prepare your house for listing

Life has a funny way of changing. When I bought my first house, an original beach cottage only a block from the water, I was a single professional. It was my own little private oasis. A home I thought I’d own forever. But about five years in, I fell in love, my boyfriend moved in (and promptly pointed out the lack of garage — one of every man’s must-haves), I acquired a charming new stepson and the need for more space. My little oasis was suddenly feeling a bit too squeezed for three — and keeping it was feeling a bit too, dare I say it, selfish.

So I decided to sell. In doing so, I fully anticipated the stress of moving (rated the third-most stressful life event) — but not the stress of selling. If you are contemplating listing your home, here are a few tips you may find helpful:

1. DE-CLUTTER WELL IN ADVANCE

Even before your realtor sets an eye on your home — and at least a month prior to listing (make that two months if you still have VHS tapes) — confront your basement and open your closets. Take off the filtered glasses that prevent you from seeing the clutter you’ve accumulated over several years or more. Toss out, recycle and donate.

One of things people look for when shopping for homes (as you likely did) is ample space. You do not want yours to scream: “Not enough space!” Streamline. And doing it before your realtor instructs you to puts you ahead of the game and relieves stress. Here are some tips:

– Take old DVDs, CDs and electronics (phones, electric cords, printers, etc.) to your local electronics store for recycling — it’s free.

– Create a pile for Goodwill or Value Village and a pile for things, like clothing, that your mother, sister or girlfriends have always admired (and which you’ve selfishly coveted — until now).

– If you are an empty box collector, thinking you just might need to ship something soon, recycle all. Boxes take up space and are easily replaced for your move at your local grocers and the LCBO — plus your realtor will make you get rid of them anyway.

– Scan your kitchen cupboards and throw out packaged goods, spices and canned foods that have expired or donate any you won’t use.

When you think you’re done, do it again.

Note: Staging — be prepared for it to some degree — even after you’ve expertly de-cluttered. It can feel insulting when someone tells you to remove or to replace an item of furniture as if to say yours is not good enough! Before you take it to heart, remember two things: Showings are meant to present a photo-ready home. How many of us live in homes that could be shot for a magazine spread at any minute of the day? Not too many. Plus, there is a certain kind of “vanilla flavour” that realtors like to present at showings — minimalist, modern, not too much personality — in order to appeal to the broadest market. So relax, don’t take it personally, and understand that what you are selling is a slightly standardized — and very sanitized — version of your home.

2. BE YOUR OWN ADVOCATE

If you’re lucky, you’ll be working with a realtor with whom you have some prior relationship (my realtor is the woman who found me this house) and who will provide you with the information you need to do your own research of your market. What have comparable homes (e.g. number of bedrooms, fully or semi-detached, parking availability) in your area sold for in the past 10 years? What percent did your house increase in value annually over the past 10 to 15 years? You can usually gauge a percent increase by examining the previous two to three sales (including your purchase) unless you’ve owned your home more than 10 to 15 years, in which case dig deeper into the purchase history of your area and of your street. Realtors access sales histories through MLS and should provide you with this information. Alternatively, it can be gleaned at your local Land Registry office (in Toronto, this office is located at 20 Dundas St. W. at Yonge). Sales histories, regardless of current markets, both of your home and of comparable homes in your area, generally reveal consistencies and an objective measurement that can be utilized by you and your realtor when determining asking price.

It’s important to have an informed two-way discussion with your realtor about your property’s market value to bypass any potential resentments or confusions down the line (i.e. if you don’t get your asking price). As informed as realtors are about their business, this is your house, your investment and what you sell it for is yours to live with.

3. FACE PERSONAL PRIVACY ISSUES

Once you list your home, it is now open to the public during showings. People WILL open your bedroom closets and kitchen cupboards; they will be peering into how you live (or how you’ve presented it); they will give feedback to their realtors — and it may infuriate you. This is part of the process. So take a deep breath and ask yourself this: If the above makes you feel nauseous just thinking about it, you have one of two choices. Adjust your attitude or do not do open houses — only private showings. Your realtor will not like this, but it is your right.

4. IF YOU WORK FROM HOME, ANTICIPATE

It becomes particularly challenging if you work from home and, suddenly, you have to leave for showings an hour at a time throughout the day. Consider finding somewhere else to work, such as the local Starbucks. If that’s too noisy, talk to a neighbour or family member who lives in your area to see if working from one of their homes might work. If this is not an option, here are two tips:

– Make your realtor’s office aware that you work from home so that, when showings are booked, prospective buyers and their agents are told to be especially mindful of keeping within their hour appointments.

– Alternatively, whenever possible, ask to keep to half-hour appointments.

Note: Realtors will ask that you relocate your pets, in addition to you, during showings. While dogs travel easily, cats do not. I took my kitty out for the hour in his carrier, parked by the water, and provided good snacks. Cats do not like to be relocated for too long. It’s best to respect this. (Take the litter box with you or keep it exceptionally clean if left at home.)

5. EXPECT TEARS

Most people get caught up in prepping their homes and haggling over listing price and fail to prepare for the day the For Sale sign goes up. Chances are, your life is changing for the better and that’s why you are selling — to move forward, to have more space, to embrace a new career opportunity, to expand your family. But, if this is not the case, and you are selling due to something seemingly less positive such as divorce or a financial shift, remember this: Life guarantees only one thing — change. It is your response to it that matters. Buried beneath unwelcome change is often necessary change, if you can just see it. And where you live has a tremendous influence on your life perspective. In the same way we travel to broaden our experiences and perspectives, changing our living spaces can have a similar effect. If you’re selling because someone has exited your life, for instance, a fresh space will likely bring renewed energy and focus.

Selling is an emotional experience, regardless of why you’re selling — and especially if it’s your first home. So when that sign goes up and the tears start flowing, take a moment to honour the happy memories you have of living in your home. And then embrace all the possibilities that lie ahead.

Reprinted courtesy of The National Post.